
You are creating forms in order to collect data from your audience and the Submission Manager in Forms Builder, let you create, view, edit and delete these data collected by your forms.
How To Access The Submission Manager?
To access the Submission Manager, you must go to Form Manager and click on the form name. From there click on Submission (Paper Airplane icon). Now you can check, edit or delete your submissions.
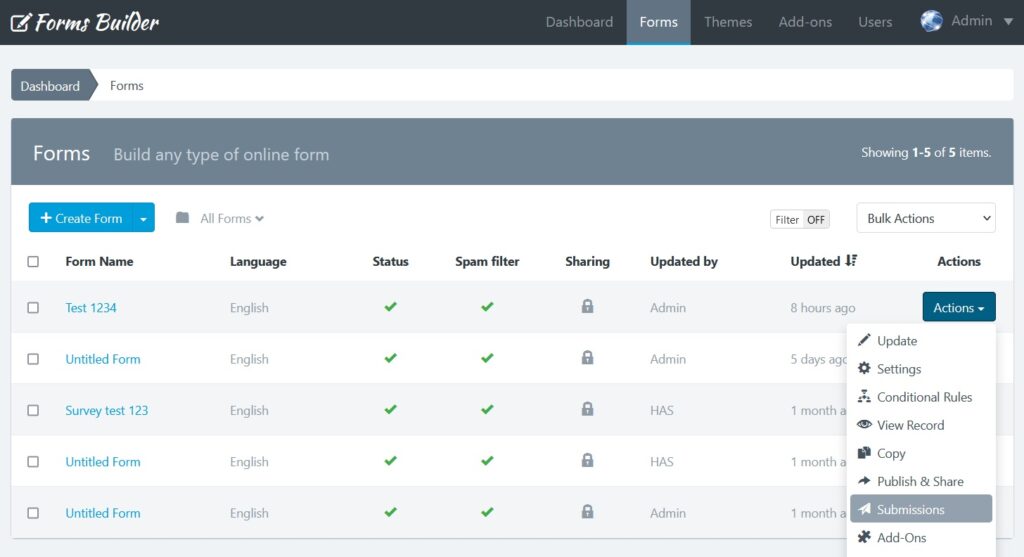
The Submission Manager, unlike other managers of the application, offers more features to adapt flexibly to the data collected by your forms. By default, it will display the first 4 fields to keep a perfect compatibility with the Grid View. Then, you can use the tool to set up what columns to show or hide.
These are some Submission Manager features you should consider:
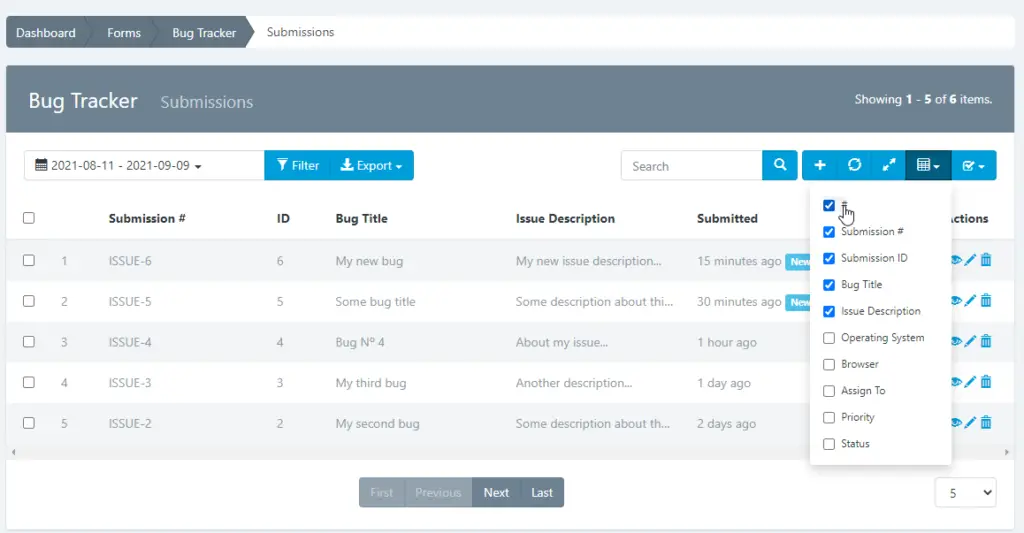
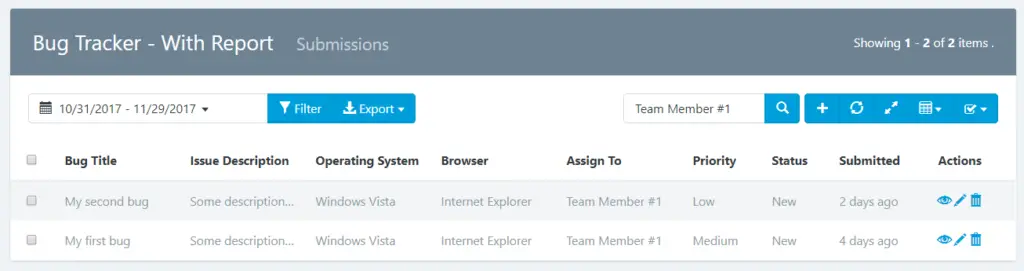
- Navigation: The Submission Manager displays submissions in tabular form. In the table upper cell, the form field label will be displayed and then the submission data corresponding to that field. Submissions have been sorted by creation date (when they were sent). You can sort your submissions by clicking on the cell “Submitted”. Also, the number of submissions displayed per page has been defined according to the number of rows for the entire application, default is five. To view more submissions, you can use the Next and Previous buttons to go forward or backward.
- Show / Hide columns: You will see a button with a Table icon to the search box right. If you hover the mouse over it, the message “Show / Hide Columns” appears. If you click on this button, a list with the name of each column will be displayed, remove the check of any column name, and the column will be hidden, check to the same name, and the column will be displayed. The only thing to keep in mind at this point is that you cannot hide the “Checkbox”, “Submitted” and “Actions” columns. Also, they must show at least two fields. If your form has many fields, use this feature to organize your manager to your preference. Take into account that the selected configuration will be saved in your User Preferences, so you will see the same configuration on any browser or used device.
- Submission ID vs Submission Number vs Serial Numbers: While the Submission ID is the number that identifies an entry in the entire system, the Submission Number identifies an entry in a form, that is, two different forms can have the same Submission Number, while they can never share the same ID. For its part, Serial Numbers is the number that identifies a row in the Submission Manager and is in accordance with the page we are visualizing. (See: How to create custom submission numbers).

- Resize columns: If your form has a lot of fields, display them all can make the data look too close together. Use this option to expand the width of the columns to a predefined minimum. You should note that Forms Builder has a responsive design, so those fields that exceed the width of the page will be hidden. To view them you will be able to scroll horizontally.
- Reset the Manager: If you have made modifications in the manager, for example, hiding columns. You can return to the default view by clicking on the “Reset” button.
- Sort submissions: Sorting is one of the most common tools for data management. In Forms Builder, you can sort the submissions by columns, by ascending or descending order, by clicking the column header (Field Label).
- New submissions: Submissions with the “new” label next to the date are those unread. Once you enter to read the submission, the label “new” will disappear.
- DOI Status: This is a special column that shows when a form submission has been confirmed or not.
- Bulk actions: If you need, you can “delete” or “mark as read” or “mark as unread” multiple submissions at a time. For this, check the checkbox of each submission to modify and then click the top right button (Checkbox Checked Icon). It will show a menu with two options: Delete, Mark as Read and Mark as Unread. Click on the required action. You should note that to eliminate submissions, a popup will appear asking you to confirm your decision to delete. When you click OK, submissions will be deleted. This action cannot be undone.
How To Create Custom Submission Numbers?
If you need a Submission Number/Code like “INVOICE-00001” or “ISBN-0015” to identify an entry, now you can accomplish this with our “Generate Submission Number” tool. It’s located under Form Settings -> Submission Settings.

Also, you can send the submission number to the users. The {{submission_number}} token is available to use it in the Email Notifications, Webhooks and Add-Ons. For example, if you have created an Order Form, you can send the Submission Number as the Order Number in the Order Confirmation Email to your customers. See the screenshot.below

How it works
Forms Builder automatically increases this number by one for every submission received, so you won’t have to do anything. It will work its way up from the default value, but if you need to customize this number, we have added four properties for this tool to make it easier for you.
1. Number:
It’s the default number. You can use this feature to set a starting point for your Submission Number. For instance, if you were to write 1000 here, Forms Builder would start counting from 1000. One important thing to remember about this property happens when you start to collect submissions. If you set this property to a lower number than the current number, Forms Builder won’t take into account your configuration, this to prevent multiple submissions with the same number.
2. Number Prefix:
A prefix can be very useful to categorize your Numbers. You can add any string in front of your Numbers. For example, “ORDER-15” is a lot easier to understand than plain “15”.
3. Number Suffix:
Similar to Prefix. For example, Set “-ABC” to get a submission number like “15-ABC”.
4. Number Width:
It’s the minimum width of number without prefix (zeros will be added to the left side). This will change the minimum width of submission number for new entries. E.g. Set to 5 to get 00001 instead of 1. Leave empty to disable.
Important!
If you change the prefix or suffix, the number will be reset and the system will use the default number again. So to keep the sequence with a different suffix, you will need to update the start number too.
How To View a Submission Record?
When you click an entry in the Submission Manager, a vertical table with all information collected will be displayed. By default, this entry is for view-only. To edit the entry, continue reading until you find the “Editing a Submission” section.
Submission information has been divided in three sections:
- Submission Details: Shows the information collected by your form fields.
- Sender Information: Shows sender information collected by the application. Including the country, city, geolocation map, ip address, user agent, landing page, referrer url. An icon will appear to indicate if the geolocation information has been obtained with the user’s consent.
- Additional Information: Displays the Hash ID of the Form Submission. If Submissions are editable (See: Form Settings), a link to the form page to edit this entry will appear. You can share this link with your end-users to allow the edition. Also, in this section you can see the date when the Submission has been sent or updated and if it was made by a logged-in users, his username will appear.
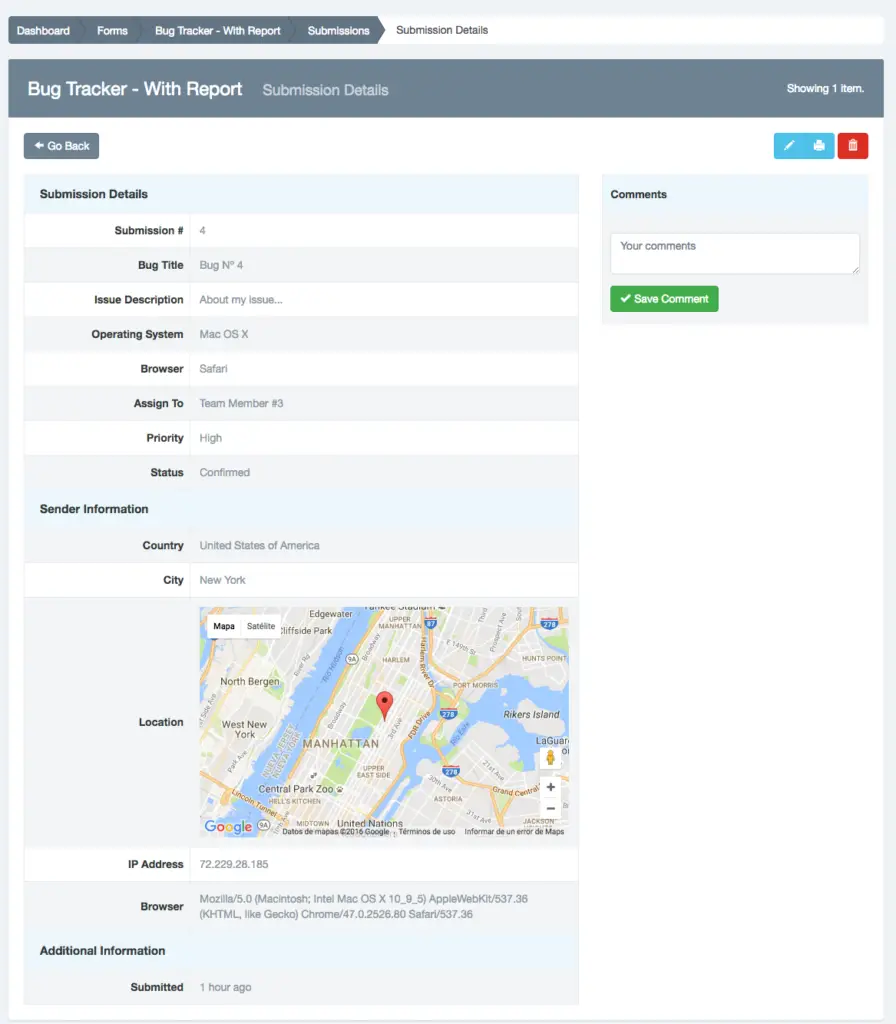
Note: Leave a comment about the submission. Comments can only be viewed in the Submission Manager—they aren’t included in exports.
How To Edit a Submission?
To edit a Submission, go to the Submission Manager. Then, perform the following steps:
- Click on the submission to edit.
- You will see the Submission Information and at the right top see the “Edit” (pencil icon) button.
- Click the Edit button.
- The vertical table will become a similar form than the one you have created.
- Make the changes you need
- Submit the Form
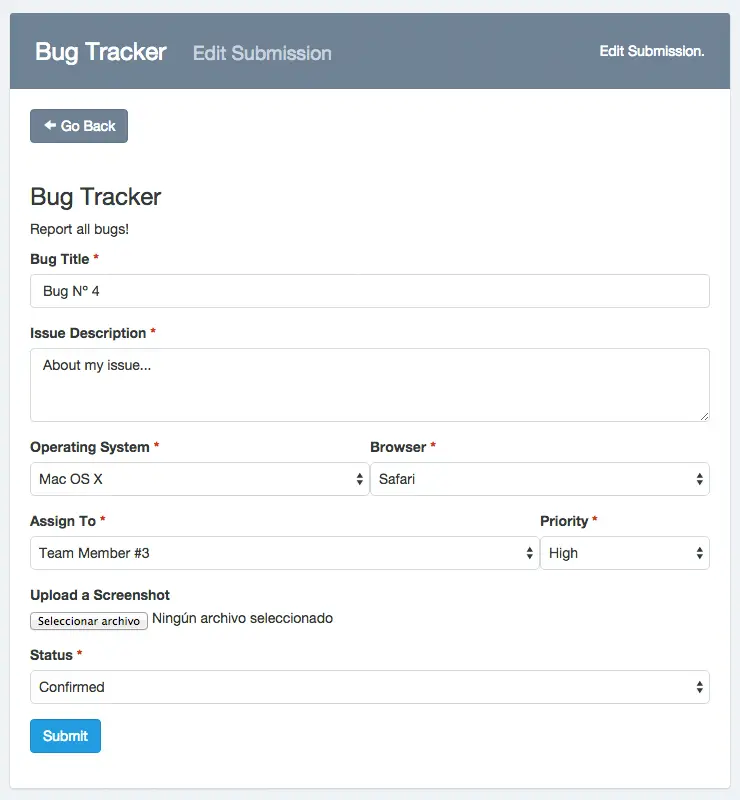
Note: Keep in mind that when you edit an item, the data related to that submission will be overwritten permanently.
How To Create a Submission?
To edit a submission, go to the Submission Manager. Then, perform the following steps:
- Click the Add submission button (icon with the plus sign)
- You will see a similar form than the one you have created.
- Make the changes you need
- Submit the Form
- The new Submission will appear in the Submission Manager.
How To Delete Submissions?
To delete a submission, go to the Submission Manager. Then, perform the following steps:
- Click on the submission you want to delete
- Click on the Delete red button (trash can icon) at the top right.
- A pop-up will appear asking you to confirm your decision to delete the submission.
- Click OK.
Note: Keep in mind that when you delete an item, the data related to that submission (including attachments) will be removed permanently.
How To Print Submissions?
To print a Submission, go to the Submission Manager. Then, perform the following steps:
- Click on the submission to print.
- You will see the Submission Information and at the right top see the “Print” (printer icon) button.
- Click the Print button.
- The page preview to print will be displayed in black and white with submission details
- Make the changes you prefer in the printer dialog window
- Click on ‘print’
How To Filter Submissions?
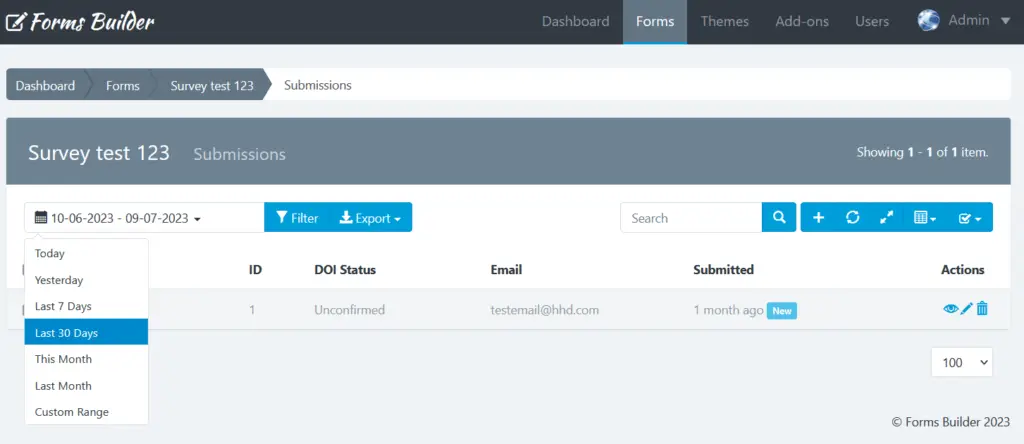
To filter the data collected by the form you must select the Date Range and click the “Filter” button.
How To Export Submissions?
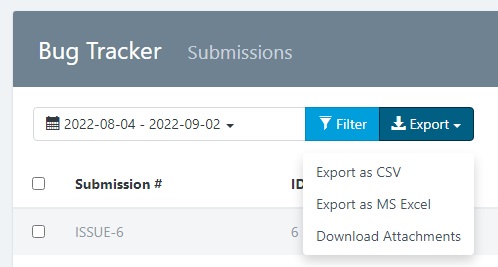
To export the data collected by the form you must select the Date Range and click the “Export” button.
Then select the format of the file to be generated:
- Export as CSV
- Export as MS Excel
- Download Attachments
How To Search For Submissions?
To search, enter the search criteria in the search box located at the top of the Submission Manager. The search engine will return all instances of the word found in all the collected fields.
Find a submission by its ID or Custom Number is possible. To find a specific submission, use the key “id” followed by the colon and the ID, or you can use the key “#” followed by the colon, and the Number. For example, id:123 or #:ORDER-123.
Also, you can filter submissions by Double Opt-In (DOI) status. To find/list confirmed email entries, use the keyword “status:confirmed” (without the double quotes), and to find/list unconfirmed email entries, use the keyword “status:unconfirmed” (without the double quotes).
How To Manage Submitted Files?

You can manage files sent with your forms. Basically file management allows to:
- View sent files associated with the field used (label).
- Upload files when creating Form Submissions using the Submission Manager.
- Update uploaded files.
- Delete files
Important! When trying to update a Submission file made before the upgrade to version 1.3.6, older files will appear at the bottom of the list of uploaded files. You can remove them when you consider appropriate.
How To Resend a Notification or Confirmation Email?
If your form has been configured to send confirmations or notifications by email, an Email button will appear in the Submission Details page. To resend any of these emails, just click on them and confirm you want to send.

Other Forms Builder Manuals
- Forms Builder: Create Forms Easily (Landing Page)
- Forms Builder: Account Manager Manual
- Forms Builder: Form Creation Manual
- Forms Builder: Creating Rules Manual
- Forms Builder: Managing Forms Manual
- Forms Builder: Themes Designer Manual
- Forms Builder: Add-Ons Manager Manual
- Forms Builder: Templates Manual
- Forms Builder: In-App Analytics Manual
- Forms Builder: Report Builder Manual